Inspiration
Not so long ago, I saw a dress on Tumblr. I was inspired, I was in love. I had to make something like it. Beads, Butterflies, Belle Epoque!
The Original is a Worth Gown which came up for sale at a major costume auctioneers. As I don't have that kind of money, I had to settle for pictures. These and more can also been seen in high res on the liveauctioneers website here. (scroll down for pictures).
The Original is a Worth Gown which came up for sale at a major costume auctioneers. As I don't have that kind of money, I had to settle for pictures. These and more can also been seen in high res on the liveauctioneers website here. (scroll down for pictures).
 |  |
 |  |  |
 |  |

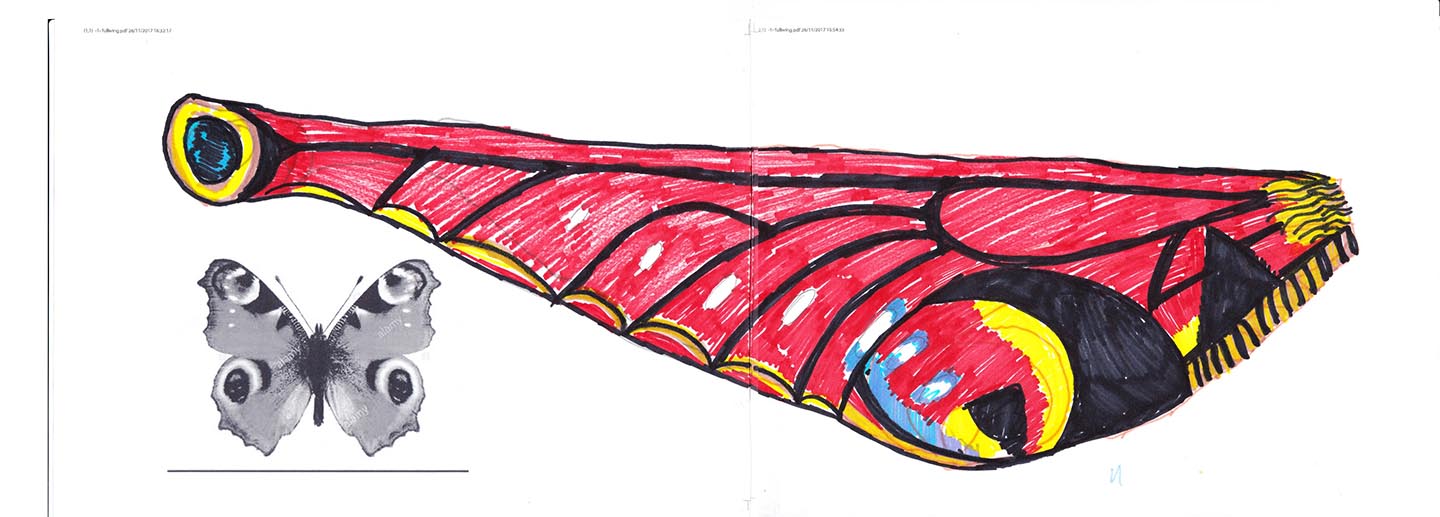
I decided that the Swallowtail wasn't the butterfly for me, so I chose a new one:
The Peacock Butterfly. I developed a simplified design from photgraphs, which was used as a template for the bodice pieces.

It was clear to me from studying the dress in detail, that the wings on the back have been added by a different designer as they don't match, so I have followed suit and added my own style of wings.
Design and Materials
Hours were spent poring over high res versions of the original photos (downloaded from the original auction website.) The beading is self-explanatory, but how was the black fluffy part of the wings done?
Chenille thread? The wide black parts are too smooth. The wear patterns don't look like sewing or couching.
Flocking? A difficult technique, and the pile is too thick.
Devore? There's a lot of pile removed, but that would work. The multicoloured parts could then be overdyed,
Devore would be quicker than embroidery, a fun new technique to learn, and period correct, so that 's what I settled on.
I had a lovely trip to Beckford's silk to buy fabric. I didn't want to go for a straight red fabric, as that would give a very brash look to the gown, instead I took a somewhat oversaturated photo of my chosen butterfly, and matched to that.
Thus I ended up with a burgundy silk for the skirt, a burnt orange organza for the sleeves, and gold silk for the sash. The beaded part started as white velvet.
A project with this much time investment deserved good fabric, and devore can only be done on a real silk-backed velvet. (The Worth gown might have had a cotton pile, the modern fabric has a viscose pile).

The basic dress is a 1912 ish evening gown, so I decided to make life easier by using the Laughing Moon #104 pattern. The first time through a pattern can be "interesting", so I found excuses to make up 2 dresses before I started the Butterfly. I made one for my daughter in a standard size, then one for myself. I often have to draft off the end of the size chart, but I actually wasn't the largest size, hurrah!

I love this shape, it's simple, flattering and really easy to tweak and embellish.
The skirt panels pattern needed to be completely redesigned to fit the Peacock butterfly, so I used my original template, morphed it and stretched it in Photoshop, then coloured it by hand as a reference.

There were 3 main stages to this dress: devore, beading and sewing.
The Devore stage is documented separately here.
The beading took nearly 2 months, averaging 4 hours a day.
I was originally planning to improve my skills by tambouring this dress, but after such a steep learning curve with the Devore I decided to stick with my existing skill set and sew.
The dyed panels were stretched on a custom made frame (I'm fortunate my husband is a woodworker!). The edges of each panel were reinforced with twill tape, and stretched onto the frame with cotton string and a sail-making needle. The tensioned fabric makes beading large areas feasible. Not surprisingly my beading skills improved hugely along the project. I moved from sewing 2 at a time to couching, and developed a few tricks to speed things up. I used polyester thread, and metallic quilting thread (much stronger than normal metallic thread). All my beads (nearly 1kg of them) were bought from my local bead shop, Tanzee Designs.
As this was such a long project, I've put the progress photos into a slideshow .
Making up the gown after all this was relatively straightforward!
The skirt panels pattern needed to be completely redesigned to fit the Peacock butterfly, so I used my original template, morphed it and stretched it in Photoshop, then coloured it by hand as a reference.
Construction
There were 3 main stages to this dress: devore, beading and sewing.
The Devore stage is documented separately here.
The beading took nearly 2 months, averaging 4 hours a day.
I was originally planning to improve my skills by tambouring this dress, but after such a steep learning curve with the Devore I decided to stick with my existing skill set and sew.
The dyed panels were stretched on a custom made frame (I'm fortunate my husband is a woodworker!). The edges of each panel were reinforced with twill tape, and stretched onto the frame with cotton string and a sail-making needle. The tensioned fabric makes beading large areas feasible. Not surprisingly my beading skills improved hugely along the project. I moved from sewing 2 at a time to couching, and developed a few tricks to speed things up. I used polyester thread, and metallic quilting thread (much stronger than normal metallic thread). All my beads (nearly 1kg of them) were bought from my local bead shop, Tanzee Designs.
As this was such a long project, I've put the progress photos into a slideshow .
Making up the gown after all this was relatively straightforward!
|
|
|


|
|
|


|
|
|


|
|
|


 |
| The finished bodice panels |
The finished dress:


For Ciel. I will always remember the Butterflies.
No comments:
Post a Comment